Onboarding: Hardware Installation Guide
 Please refer to our Site Requirements Guide to ensure your site is properly equipped to install any hardware.
Pepwave Router
Model: Peplink Balance 20x
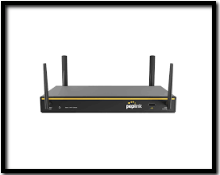
What's in the box?
- Pepwave router
- Power Cable
- Cellular Cable
- Wi-Fi Antennas
- Cellular Antennas
Connecting the power
- The power port is in the back of the device
- Attach the power cable to DC connector port
Connecting the ISP Modem/Router
- It is important that the network is configured in the following order:
ISP Modem/Router → Pepwave Ethernet WAN
Connecting a Switch
- It is important that the network is configured in the following order:
Pepwave Ethernet LAN → Switch → Precision POS, Printer, KDS, Credit Card Reader
Please click here for steps to configure a cellular SIM card.
Point of Sale
Model: Precision S15, D15
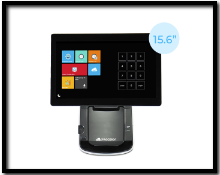
What's in the box?
- POS System
- Power Cable, Power Adapter
- Dust Cover
Connecting the power
- The power port is behind the back cover
- Lift the cover and attach the power cable
Connecting ethernet
- Lift the back cover and connect an enthernet cable to the LAN port
- Ensure that the indicator light is green
Connecting a Cash Drawer
- If the POS has an integrated printer connect the cash drawer directly to the POS
- Lift the back cover and connect the cash drawer cable to the cash drawer port
Loading a paper roll
- Pull the printer release button located under the front screen, to the right
- Load the paper with the the till rolling over
Powering on
- Select the power button on the front of the device to boot the Android OS
Connecting the internet
- Navigate to Android Settings > Network & Internet
- Ensure that Wi-Fi is disabled and there is an IP address displaying under the Ethernet section
Launching the Precision POS app
- Click the Precision POS launcher icon on the desktop to open the app
Thermal Receipt Printer
Model: Epson SRP-E300
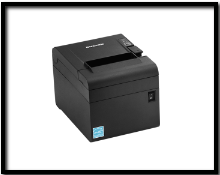
What's in the box?
- Thermal Printer
- Power Cable, Power Adapter
- Starter paper roll
Connecting the power
- The power port is in the back of the printer
- Attach the provided power cable to the power port
Connecting ethernet
- The ethernet port is in the back of the printer
- Connect an ethernet cable to the ethernet port
Loading a paper roll
- Lift the release button on the top right of the printer to open the lid
- Load the paper with the till rolling under
Retrieving the IP address
- Power off the printer by clicking the power switch on the front
- Hold in the paper feed button, and switch the power back on at the same time
- A Self-Test receipt containing the IP address will start printing
- Once the receipt is finished printing, press the paper feed button once more to disable "Test Mode"
Defining the printer in the POS
- On the POS login screen, navigate to:
Station Configuration → Printer / KDS Settings → Receipt Printer / KDS Configuration - Security Code: 0994157
- Check mark a row to enable a printer
- Ensure the following fields are set:
- Printer / KDS Type: (Network) Epson Thermal Ethernet
- Print / Display Style: Customer Receipt
- Hostname / IP Address: [ insert printer IP address ]
Dot Impact Kitchen Printer
Model: Precision IM-P90
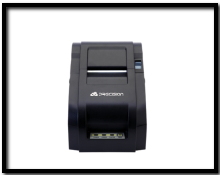
What's in the box?
- Impact Printer
- Power Cable, Power Adapter
- Starter paper roll
Connecting the power
- The power port is in the back right
- Attach the provided power cable to the DC power port
Connecting ethernet
- The ethernet port is in the back left
- Connect an ethernet cable to the ethernet port
Loading a paper roll
- Lift the release button on the top right of the printer to open the lid
- Load the paper with the till rolling under
Retrieving the IP address
- Power off the printer by clicking the power switch on the left side
- Hold in the paper feed button on the front of the printer, and switch the power back on at the same time (approx. 10 seconds)
- A Self-Test receipt containing the IP address will start printing
- Once the receipt is finished printing, the printer then enters into On-Line mode

Please contact Precision Support so we can reserve this IP address.
Defining the printer in the POS
- On the POS login screen, navigate to:
Station Configuration → Printer / KDS Settings → Printer Configuration - Security Code: 0994157
- Check mark a row to enable a printer
- Ensure the following fields are set:
- Printer / KDS Type: (Network) Epson Impact
- Print / Display Style: Kitchen (Full)
- Hostname / IP Address: [ insert printer IP address ]
DIP switch settings
- Power off the printer by clicking the power switch on the left side
- Press and release the paper feed button instantly as the power is applied to the printer
Indicators
- The three LED indicator lights are located on the top cover
Kitchen Display System (KDS)
Please contact Precision Support so we can reserve this IP address.
Credit Card Reader
Model: PAX S300
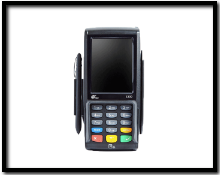
Model: PAX A35
Model: PAX A77, A60
Please contact Precision Support so we can reserve this IP address.
Caller-ID Box
Please contact Precision Support to facilitate a call with our Caller-ID partner, Pizza Cloud.
Cash Drawer
Barcode Scanner

Contact Precision Support:
Phone: 1-855-673-3700, ext 2
Email: support@precisionpos.com
Related Articles
Onboarding: Site Requirements Guide
To ensure that your site is ready to install your Precision hardware, please follow this Site Requirements Guide. Introduction Your business has already begun the implementation process, but there are a few onsite requirements you will need to ensure ...Credit Card: Troubleshoot "Connect Error" Between PAX & POS
Possible Reasons A PAX Connect Error occurs when the POS terminal is unable to send payment data to the PAX reader for processing. One of the main reasons for this error is that PAX IP Address has not been set under Station Configuration > Credit ...Credit Card: Reader Not Working
Credit Card Reader Not Working Confirm that the POS and the Credit card device are plugged in to power and are connected to the internet Step 1. Go to Main screen can click station configuration Next Click on Credit Card Setup Confirm that the ...Onboarding: Steps to Go-Live
This checklist is intended to be used as a self-guide for your implementation process. Welcome! Thank you for choosing Precision POS! Welcome to the family of restaurateurs who have chosen a Point of Sale system designed, built, and supported by ...POS: Setting Up a Virtual Drawer
Setting Up a Virtual Drawer In the article, we will show how to set up a virtual drawer to allow a POS to connect to another POS with a cash drawer On POS that has a physical cash drawer, click the cloud icon and write down the Licensee ID before ...